
External disks such as USB, external hard drive, thumb drives, and SD card are frequently used as secondary storage devices to store sensitive data. This physical extension of storage devices helps the users enjoy convenience with data sharing.
However, this practice does come with its flaws. There are times when the external hard drive shows “Read-Only” errors. This means that the drive you are trying to access allows you to start a read-only operation.
Reasons Why Your External Hard Drive Is Read Only On mac
Whenever you find that your external hard drive is showing read-only messages, there are only three possibilities that could lead to such an issue.
1. The Data have NTFS Format
The best way to know about the data format is to look at its info. If you can see the NTFS file format, that is what is causing the problem. This problem can be solved with the NTFS for Mac.
2. Need Access Permission
Any external drive that is connected with the mac operating system has access permission. So, when you connect an external hard drive that is not accessed by your system, it will show read-only.
3. Hard Drive Has Formatting Errors
Another one of the most common reasons why a hard drive shows read-only errors is that there could have been formatting issues. If you get a warning “your device is only mounted and authorized to read-only action”, you better check the format of the drive.
How to Solve A “Read-Only” Issue?
Now you know what caused your external hard drive to show “Read-Only” errors, it is time to know the solutions to fix the problem.
Solution 1: Ignore Permission
Permission restrictions often happen, especially when your hard drive has been used in another system. The situation might stand that the previous owner was a windows user and had formatted the file according to the system.
If that file is shared with a mac user, the user has permission for read-only action. The following steps will enlighten you to change the permission.
- Connect the external hard drive with your mac and wait till the mounted process completes itself.
- Select the drive and right-click it.
- Go to “get info”.
- Scroll down the menu. At the bottom, you will find the sharing and permission option. Unfold the option.
- By clicking the sharing & permission option, you will be able to see a Read-only setup.
- Input your name and password.
- Change the setting to read and write.
- Click the lock to ensure your changes stay intact.
However, if you are the system administrator, you can simply click the checkbox that states that you are ignoring all the permission.
Solution 2: Reformat You Drive
If the permission is not the issue, then the file system might be the one blocking the road. Again, get into the “get info” section of the external hazard drive and see the file format of the hard drive.
If you find an NTFS file format, you can change the file format with the Mac operating system kernel extension. But this process becomes tedious as you need to add an extension every time you want to access the file. The best way would be to format the hard drive to FAT.
Solution 3: Use Third-Party Software
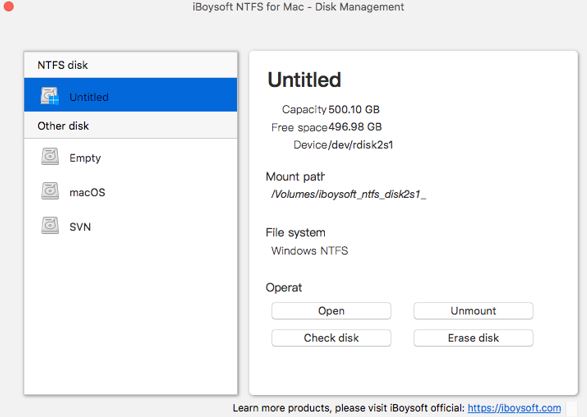
The last method is to use third-party software to write to NTFS drives on Mac, no matter if it’s a paid or free NTFS for Mac. iBoysoft NTFS for Mac is highly recommended. It acts as a tool and bridges the communication gap between the NTFS formatted hard drive and mac operating system.
You simply need to download iBoysoft NTFS for Mac on your Mac and leave the rest to the software. Every time new data is received with a different file format, you receive a notification, and the software will help you easily access the data.
Conclusion
When the external hard drive suddenly starts showing “Read-Only”, do not panic. There is nothing to worry about. We have already discussed the causes that lead to this issue.
We have also listed down the solutions that can help you to solve the read-only issue. We would like to remind you that reformatting methods are certainly one of the best ways to deal with this problem.


